Rz is always Rz…isn’t it? Usually, but not necessarily.
Rz, the average maximum surface height, is one of the most widely used surface texture parameters. It’s calculated by finding the maximum peak-to-valley height within each sampling length, then averaging those values.
Rz has some confusing history…but it’s important to note that virtually all modern instruments and software now calculate Rz the same way. Despite this convergence, there are still pitfalls that you need to know about.
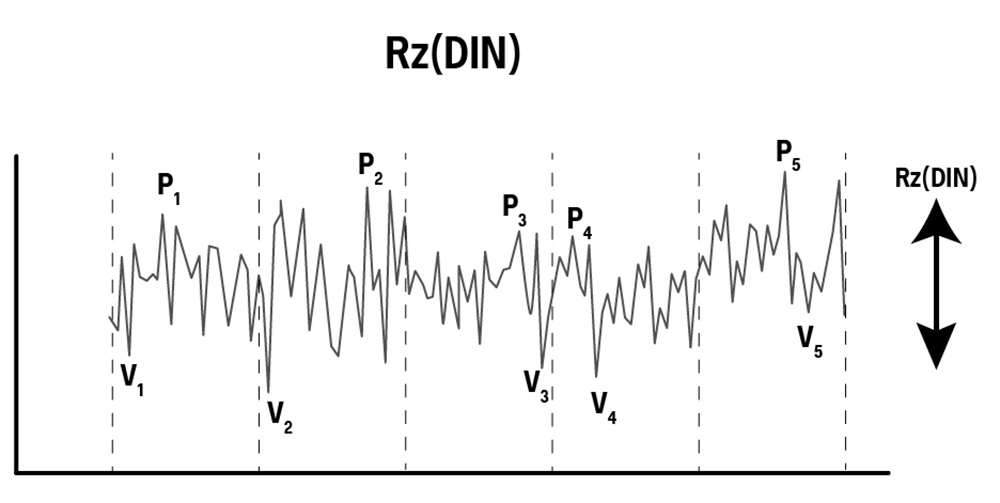
Rz is calculated today as follows. The height difference between the tallest peak and lowest valley is determined in each sampling length. These values are then averaged over the evaluation length to get Rz. This value may be referred to as Rz(DIN), in reference to the German DIN 4768 standard in which it was first defined.

Today, the ISO, ASME, and JIS standards all define Rz by this calculation. But it wasn’t always this easy.
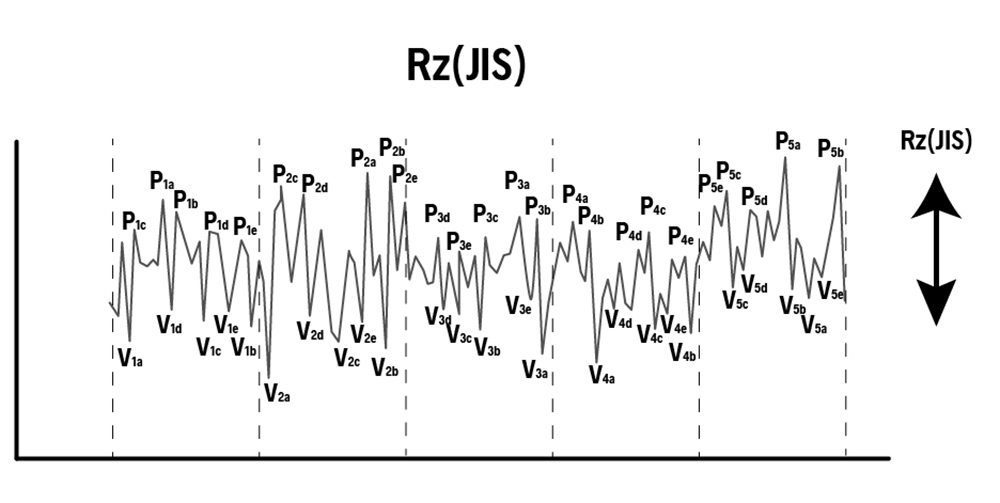
When the JIS B0601 standard was developed, the Rz calculation had an important difference: the peak-to-valley height in each sampling length was determined using the five highest peaks and five deepest valleys, rather than just one peak and valley. This definition of Rz is sometimes referred to as Rz(JIS).

Because Rz(JIS) uses five times as many points, the contribution of the most extreme points tends to be somewhat lessened. For this reason, Rz(JIS) is always smaller than Rz(DIN).
For various periods during the 1980s through the 1990s, the ISO, ASME and JIS standards defined Rz as Rz(JIS), and not always at the same time. This discrepancy created a great deal of confusion: a part that passed final inspection in one facility may be rejected on incoming inspection at the next, simply because the facilities were using different Rz definitions!
Today all of the standards define Rz by the Rz(DIN) method, using one peak and one valley to calculate max peak-to-valley in a sampling length, then averaging all of the values over the evaluation length. When software shows “Rz,” it means Rz(DIN). The ASME standard also requires that the number of sampling lengths to use must be specified. For example, “Rz20” indicates that Rz must be calculated over 20 sampling lengths.
That said, there are still situations in which Rz can be confusing:
- Older drawings may reference “Rz” but intend it as Rz(JIS)
- Older measurement systems and software may calculate Rz as Rz(JIS)
- Some vendors may use drawings or software referencing Rz as Rz(JIS).
As a further complication, some gages will divide the entire evaluation length by five and calculate Rz over these five “samples.” A short trace will give you five short “samples,” a long trace five long “samples!”
If you begin to see different Rz values than expected from a process, or different values than your supplier or customer are measuring:
- Verify how the drawing specifies Rz, and that Rz is being calculated per the drawing
- Verify how the measurement system and software calculate Rz. The documentation should describe the calculations; if not, contact the vendor.
- Verify that the specified number of sampling lengths is being evaluated. A different evaluation length will produce a different Rz value.
- Some software includes both Rz(JIS) and Rz(DIN) to support older drawings. Make sure that the same, correct parameter is being used for the data analysis.
If you’d like to learn more about the Rz parameters, and many other practical issues, check out the Surface Texture Answer Book by Carl Musolff and Mark Malburg. It’s full of great insights into how to specify, measure and analyze surface texture.
You may also want to learn more about our online and in-person classes to take a deeper dive into surface texture analysis.
Please fill out the form below to download this article as a PDF:
