Michigan Metrology offers surface roughness measurement services, from one component to thousands. Our surface texture measurements are aided by the NPFlex 3D Optical Profiler, provided by Bruker Corporation.
The NPFlex is a microscope in which each objective lens contains a specially designed interferometer. The microscope portion of the instrument provides the “image” of the surface whereas the interferometric portion provides the height information comprising the surface. The primary mode of operation is the Vertical Scanning Interferometry (VSI) technique. The Phase Shifting Interferometry (PSI) mode is used for super smooth components such as optical mirrors and polished silicon. The advanced VXI mode combines the scanning range of VSI with the height resolution of PSI for supersmooth surfaces that are not flat, such as lenses.
About 3D Optical Profiling
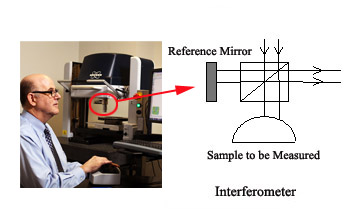
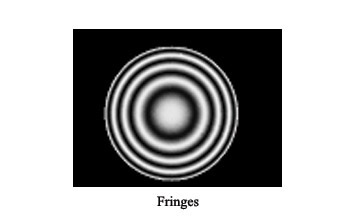
In an optical profiler, light travels down from the microscope. It first encounters a beam splitter which sends half of the light to the sample being measured (e.g., the spherical sample as shown) and the other half of the light to a perfectly smooth mirror (Figure 1). The light reflects from both the perfect mirror and the surface being tested, recombining at the beamsplitter before traveling off to be imaged by the optics and camera. As a result of this process, a series of bright and dark bands (i.e. fringes) are superimposed on the image of the surface.

Figure 1. Microscope and interferometric objective lens schematic of the system used by Michigan Metrology for surface roughness measurement.

Careful construction of the interferometer results in the brightest interference fringe appearing on those points of the surface that are in “perfect” focus. Thus, as the microscope is scanned in a direction perpendicular (vertically) to the sample, the fringe pattern sweeps over the surface as each point in the image individually comes into best focus. As the microscope is scanning, an encoder is recording the relative height between the sample and the microscope. Thus when the brightest fringe is detected at a given point, the instrument records the lateral location via the camera and the height information via the encoder. Once the complete image is scanned, the computer constructs a 3D representation of the measurement.
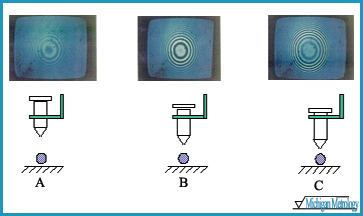
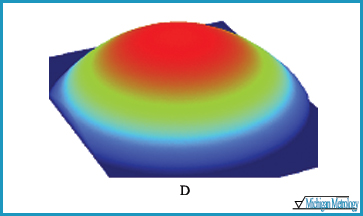
The image below demonstrates the VSI mode of measurement. The microscope is positioned far above the sample and thus a faint fringe pattern appears on the image of the sphere (a). The system is than scanned towards the sample (b) and the fringe pattern begins to form on the top of the sphere. The microscope continues to scan towards the sample with the fringe pattern occurring on the periphery of the sphere (c). Once the scan is complete, the system constructs the 3D data set (d).


Demonstration of the vertical scanning interferometer (VSI) mode of data acquisition.
The PSI Mode involves only a slight movement of either the objective lens or internal optical components to cause a small relative shift in the path difference in the light returning from the sample as compared to the reference mirror. A number of individual image frames are acquired during the shifting procedure. The stored image frames are then analyzed providing high resolution (i.e. height) measurements. The PSI mode is limited to measuring steps of 160nm or less and average roughness (Ra) of typically 200nm or less.
The instrument is capable of making measurements over various fields of m with lateral resolution on the order of a few (100 micron x 100 micron) to 7mm x 5mm with lateral resolution on the order of 20 microns. Using the stitching mode, the instrument is capable of providing a high lateral resolution image over a large area by “piecing together (stitching)” an array of images.
The height resolution is about 6nm for the Vertical Scanning Interferometric (VSI) mode and less than 0.3nm for the Phase Shifting Interferometric (PSI) mode. VXI mode combines the scanning range of VSI with the height resolution of PSI for supersmooth surfaces.
Watch a video introduction to Michigan Metrology
Michigan Metrology uses the Bruker NPFlex and other metrology instruments to complete your surface roughness measurement projects quickly, accurately and efficiently.
